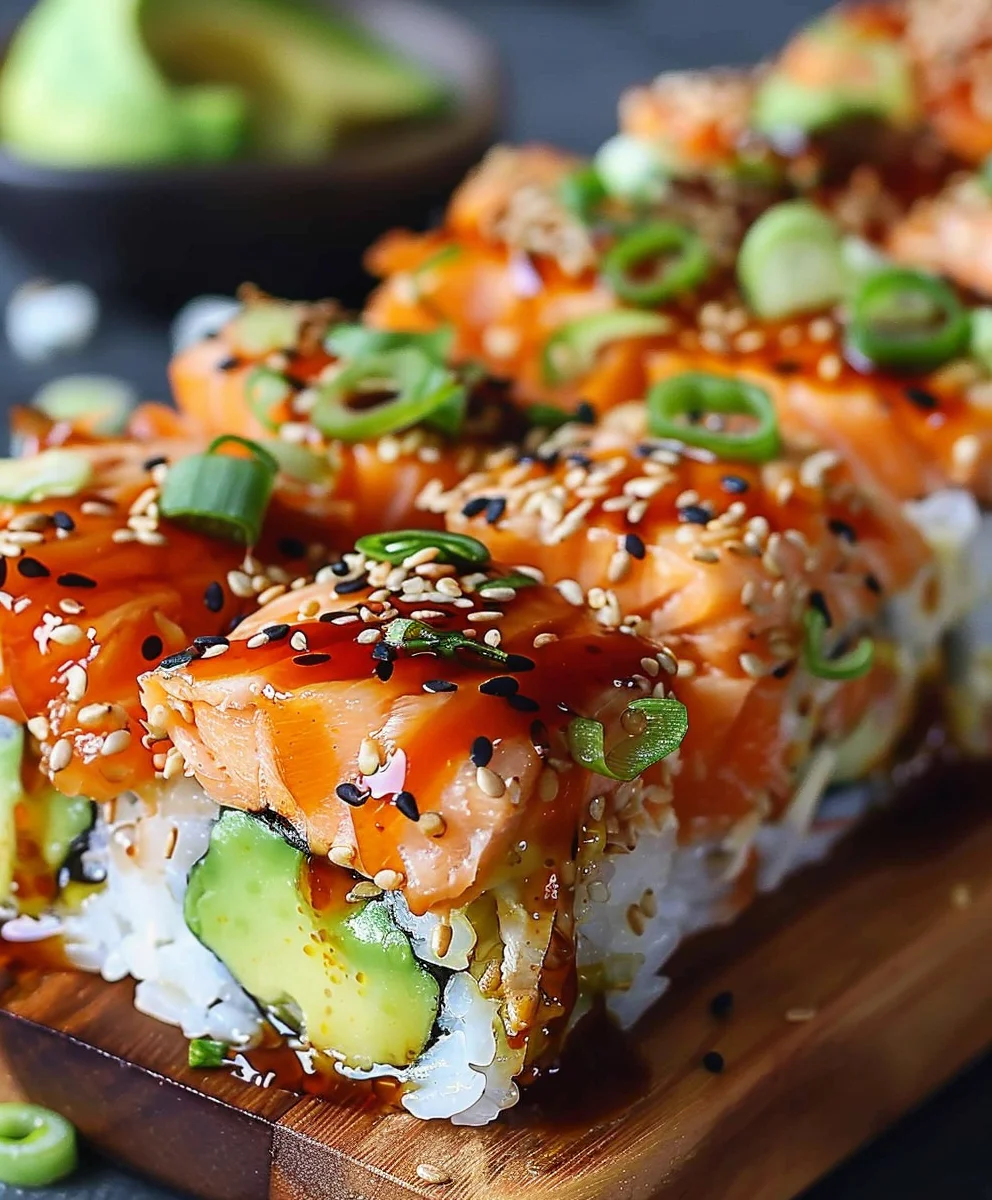
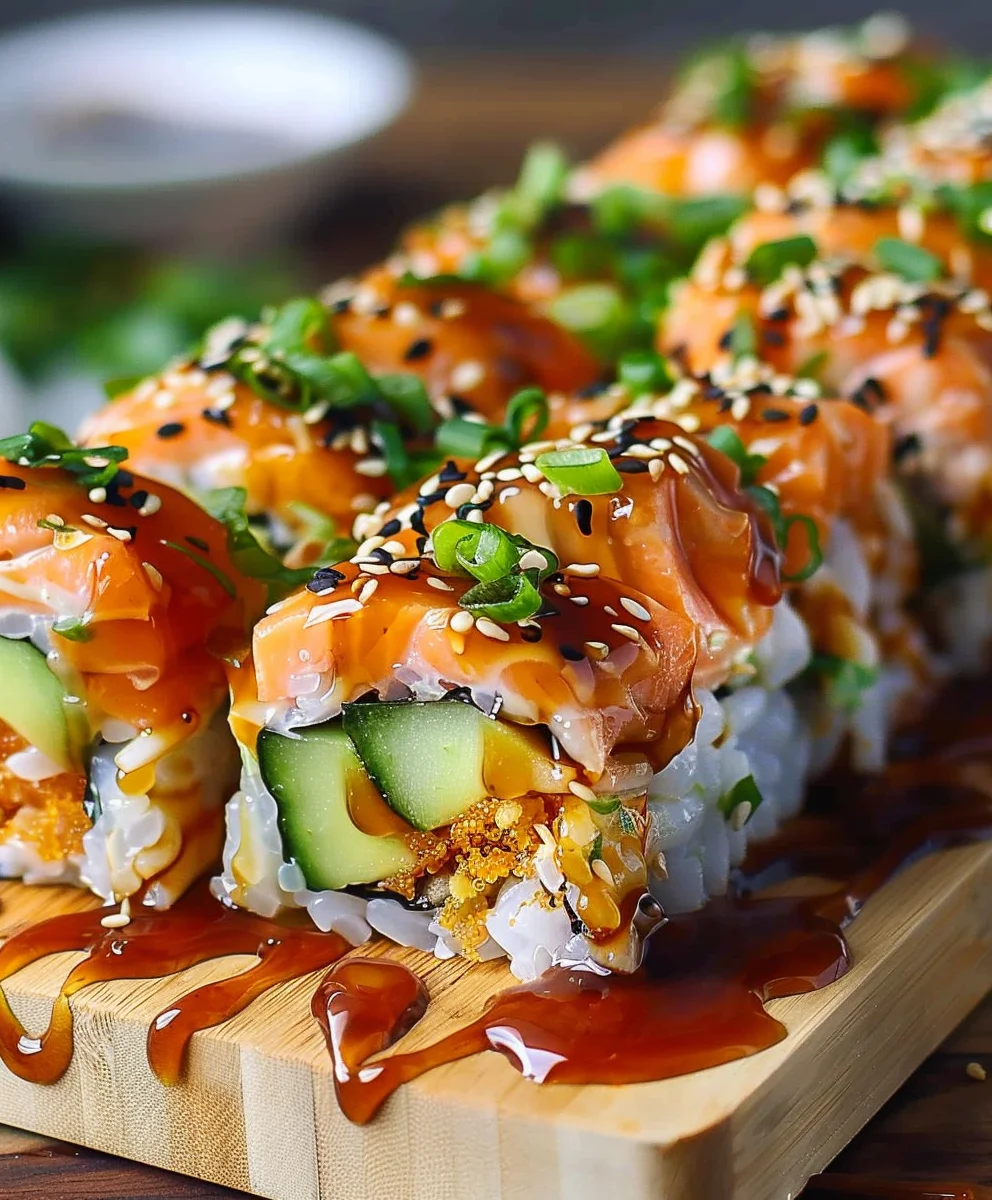
Spicy Salmon Sushi Bake has taken the culinary world by storm, offering a delightful and incredibly accessible way to enjoy the vibrant flavors of sushi right in your own kitchen. Have you ever craved the rich, savory taste of your favorite sushi roll, complete with creamy salmon and a hint of spice, but felt daunted by the prospect of rolling perfect nori sheets? Then you’re in for an absolute treat with this innovative and highly satisfying dish!
This ingenious creation, which gained immense popularity as a creative home-cooking solution and viral sensation during recent times, beautifully bridges the gap between traditional sushi artistry and convenient comfort food. It brilliantly transforms the intricate craft of sushi making into a simple, layered casserole, making it a beloved staple for casual get-togethers, potlucks, and effortless weeknight dinners alike. The Spicy Salmon Sushi Bake offers all the umami-rich satisfaction without any of the fuss of traditional preparation.
What makes this dish so universally adored? It’s the harmonious blend of textures and tastes: perfectly seasoned sushi rice forms a comforting base, topped generously with a creamy, succulent salmon mixture, often enriched with ingredients like Japanese mayonnaise and sriracha for that perfect kick. A sprinkle of crunchy furikake and a sheet of toasted nori add an irresistible crunch and depth of flavor, culminating in a warm, inviting dish that’s incredibly satisfying. People cherish its versatility, its ease of preparation, and most importantly, its absolutely delicious, crave-worthy profile that brings joy to every single bite.

Ingredients:
-
For the Sushi Rice:
- 2 cups (about 400g) short-grain sushi rice
- 2 ½ cups (about 600ml) water
- ¼ cup (60ml) rice vinegar (unseasoned is fine, but seasoned adds a bit more flavor)
- 2 tablespoons granulated sugar
- 1 teaspoon salt
- Optional: 1-2 sheets nori, thinly sliced for layering (optional, but highly recommended for an authentic sushi bake flavor)
-
For the Spicy Salmon Filling:
- 1 ½ pounds (about 680g) skin-on or skinless salmon fillet, preferably wild-caught for best flavor
- 2 tablespoons olive oil or sesame oil
- ½ teaspoon salt
- ¼ teaspoon black pepper
- 4 ounces (113g) cream cheese, softened to room temperature
- 2 tablespoons mayonnaise (Japanese Kewpie mayo is preferred for its rich flavor)
- 1 tablespoon soy sauce (low-sodium is good to control saltiness)
- 1 teaspoon sesame oil
- Optional: 1 tablespoon sriracha or other chili garlic sauce for an extra kick within the filling
-
For the Spicy Mayo Drizzle:
- ½ cup (120ml) mayonnaise (again, Kewpie mayo is excellent here)
- 2-4 tablespoons sriracha, depending on your preferred level of spiciness
- 1 teaspoon sesame oil
- 1 teaspoon rice vinegar
- Optional: A squeeze of fresh lime juice for brightness
-
For Garnish and Serving:
- 2-3 sheets nori, cut into small rectangles or squares (for serving, like little wraps)
- 2 green onions, thinly sliced (green parts only, for color and mild onion flavor)
- 1-2 tablespoons toasted sesame seeds (white or black, or a mix)
- Optional: Avocado, thinly sliced (adds a creamy texture and healthy fats)
- Optional: Tobiko or Masago (flying fish roe or capelin roe, for a pop of color and briny flavor)
- Optional: A sprinkle of furikake (Japanese rice seasoning)
- Optional: A drizzle of unagi sauce (sweet soy glaze)
Preparing the Perfect Sushi Rice
The foundation of any great Spicy Salmon Sushi Bake begins with perfectly cooked and seasoned sushi rice. This isn’t just any rice; it’s the sticky, slightly sweet, and tangy base that holds all the delicious flavors together. Trust me, taking the time here makes all the difference!
-
Washing the Rice:
First things first, let’s get that sushi rice sparkling clean. Place your 2 cups of short-grain sushi rice into a large bowl. Cover it with cool water and use your hands to gently swirl and massage the rice. You’ll notice the water will become cloudy almost immediately due to the excess starch. Carefully drain this water and repeat the process about 5-7 times, or until the water runs mostly clear. This step is crucial for achieving that desirable sticky-but-not-mushy texture. Don’t skip it!
-
Soaking the Rice:
Once your rice is clean, drain it one last time. Now, transfer the washed rice to a medium saucepan with a tight-fitting lid. Add 2 ½ cups of fresh water. Allow the rice to soak for at least 30 minutes. This pre-soaking helps the rice absorb water evenly, leading to a more consistent cook and better texture. It’s a small step that yields big results for your Spicy Salmon Sushi Bake.
-
Cooking the Rice:
After soaking, place the saucepan with the rice and water over high heat and bring it to a rolling boil. As soon as it boils, reduce the heat to the lowest setting, cover the pot tightly with its lid, and let it simmer for 15 minutes. Resist the urge to peek! Lifting the lid releases steam, which is essential for proper cooking. Once the 15 minutes are up, remove the pot from the heat, but keep the lid on. Let the rice steam, undisturbed, for another 10-15 minutes. This final resting period allows the steam to fully penetrate and finish cooking the grains, making them plump and tender.
-
Seasoning the Rice:
While the rice is cooking or resting, prepare your sushi vinegar mixture. In a small microwave-safe bowl, combine the ¼ cup rice vinegar, 2 tablespoons sugar, and 1 teaspoon salt. Microwave for 30-60 seconds, or until the sugar and salt have fully dissolved. Stir well to ensure everything is incorporated. Once the rice has finished resting, transfer it to a large, non-metallic bowl (a wooden or plastic bowl is ideal, as metal can react with the vinegar). Pour the warm sushi vinegar mixture evenly over the hot rice. Using a cutting motion with a rice paddle or spatula, gently fold the seasoning into the rice. Be careful not to mash the grains. Continue to gently fold and fan the rice (a small hand fan works wonders, or even just letting it air dry) for about 5-10 minutes until it cools down to body temperature and becomes glossy. This fanning helps evaporate excess moisture and gives the rice its characteristic sheen. Your sushi rice is now ready to be the delicious base for our Spicy Salmon Sushi Bake!
Preparing the Flavorful Salmon Filling
The star of our Spicy Salmon Sushi Bake is, of course, the salmon! We’re going for a rich, flaky, and incredibly flavorful salmon mixture that will perfectly complement the seasoned rice and spicy mayo. Let’s get cooking!
-
Preheating and Seasoning the Salmon:
Preheat your oven to 400°F (200°C). Line a baking sheet with parchment paper for easy cleanup. Pat your salmon fillet dry with paper towels. This helps achieve a better sear or crispier skin if you leave it on. Drizzle both sides of the salmon with 2 tablespoons of olive oil or sesame oil, then season generously with ½ teaspoon of salt and ¼ teaspoon of black pepper. Don’t be shy with the seasoning; we want that flavor to shine through!
-
Cooking the Salmon:
Place the seasoned salmon fillet on the prepared baking sheet. Roast in the preheated oven for 12-18 minutes, depending on the thickness of your fillet and your desired doneness. A good indicator is when the salmon easily flakes with a fork and reaches an internal temperature of 145°F (63°C). Overcooked salmon can be dry, so keep an eye on it! If you prefer, you can also pan-sear the salmon until cooked through, about 4-6 minutes per side, then flake it.
-
Flaking and Mixing the Salmon:
Once the salmon is cooked, remove it from the oven and let it cool slightly. Using a fork, flake the salmon into small, bite-sized pieces in a medium-sized mixing bowl. Discard any skin or bones if present. Now, let’s make this filling irresistibly creamy and savory. Add the 4 ounces of softened cream cheese, 2 tablespoons of mayonnaise, 1 tablespoon of soy sauce, and 1 teaspoon of sesame oil to the flaked salmon. If you like an extra kick, now is the time to add an optional tablespoon of sriracha or chili garlic sauce directly into the filling. Gently mix all the ingredients together until well combined. You want a uniform mixture where the cream cheese and mayonnaise are evenly distributed, binding the salmon flakes together but not turning them into a paste. Taste and adjust seasonings if needed – maybe a pinch more salt or a dash more soy sauce. This salmon filling is truly the heart of your Spicy Salmon Sushi Bake.
Crafting the Signature Spicy Mayo Drizzle
No Spicy Salmon Sushi Bake is complete without a generous, creamy, and spicy drizzle of mayo. This sauce adds a vibrant kick and luscious texture that ties all the components together. It’s incredibly simple to make, but oh-so-important!
-
Combining Ingredients:
In a small bowl, combine ½ cup of mayonnaise (Kewpie mayo is truly king here for its richer, more umami flavor profile), 2 to 4 tablespoons of sriracha (adjust to your personal heat preference – start with less and add more if you dare!), 1 teaspoon of sesame oil, and 1 teaspoon of rice vinegar. If you have it on hand, a small squeeze of fresh lime juice can brighten up the flavors beautifully.
-
Whisking to Perfection:
Using a small whisk or a fork, vigorously whisk all the ingredients together until the sauce is completely smooth and uniform in color. You’re looking for a thick, pourable consistency that can be easily drizzled. If it’s too thick, you can add a tiny splash of water or more rice vinegar to thin it out slightly. If you prefer a richer, less intense spicy flavor, you can always add a bit more mayonnaise. Give it a taste. Is it spicy enough? Creamy enough? Tangy enough? Adjust as needed. This vibrant sauce is going to be the crowning glory of your bake!
Assembling and Baking Your Spicy Salmon Sushi Bake
This is where all our hard work comes together! Layering the components correctly is key to a satisfying bite of our Spicy Salmon Sushi Bake. Get ready to transform your ingredients into a culinary masterpiece!
-
Prepping the Baking Dish:
Preheat your oven to 375°F (190°C). Choose a 9×13-inch (23×33 cm) baking dish. Lightly grease the bottom and sides with a neutral oil or line it with parchment paper for easier removal, though typically greasing is sufficient. This ensures nothing sticks and allows for clean slices later.
-
First Layer – The Rice Base:
Carefully transfer all of your seasoned sushi rice into the prepared baking dish. Using wet hands or a rice paddle, press the rice down firmly and evenly to form a compact layer at the bottom of the dish. This forms the solid base for our Spicy Salmon Sushi Bake. Make sure it’s packed tightly, about ¾ to 1 inch thick. This tight packing will help the bake hold its shape once sliced.
-
Optional Nori Layer:
If you opted for the extra layer of nori, now’s the time to add it. Arrange 1-2 sheets of thinly sliced nori directly over the pressed rice layer. This adds another layer of authentic sushi flavor and a slight textural contrast that is delightful. While optional, I highly recommend it for that true “sushi” experience in a bake!
-
Second Layer – The Spicy Salmon Filling:
Evenly spread your prepared spicy salmon filling over the rice (and optional nori) layer. Use a spatula to gently press it down and smooth out the top. You want a consistent layer of salmon so every bite of your Spicy Salmon Sushi Bake gets a good amount of that deliciousness. Ensure it reaches all the way to the edges of the dish.
-
Third Layer – The Spicy Mayo Drizzle:
Now, take your luscious spicy mayo and drizzle it generously over the salmon layer. You can use a spoon for this, or for more control, transfer the mayo to a Ziploc bag, snip off a tiny corner, and pipe it in a decorative zigzag pattern over the entire surface. This not only adds flavor but also creates a beautiful visual when baked. Don’t be shy here; this is a key flavor component!
-
Baking to Golden Perfection:
Place the baking dish into your preheated oven. Bake for 15-20 minutes, or until the top of the Spicy Salmon Sushi Bake is lightly golden brown, bubbly around the edges, and the spicy mayo has slightly caramelized. You’re looking for that perfect balance of warmth and slight crispiness on top. The aroma filling your kitchen will be absolutely incredible!
Garnishing and Serving Your Spicy Salmon Sushi Bake
Congratulations! Your beautiful Spicy Salmon Sushi Bake is hot out of the oven, smelling absolutely divine. Now comes the fun part: adding the finishing touches and serving this culinary delight!
-
Cooling and Garnishing:
Once out of the oven, let the sushi bake cool for 5-10 minutes. This helps it set slightly, making it easier to cut. While it’s cooling, gather your garnishes. Sprinkle the thinly sliced green onions evenly over the top for a fresh, vibrant pop of color and mild onion flavor. Then, generously scatter the toasted sesame seeds. If you have tobiko or masago, now is the time to add those for an extra layer of texture and briny goodness. For even more flavor and visual appeal, a light dusting of furikake can be a wonderful addition, or a drizzle of sweet unagi sauce.
-
Cutting and Serving:
Using a sharp knife, carefully cut the Spicy Salmon Sushi Bake into individual squares or rectangles, much like a lasagna or casserole. A good size is usually 2×2 or 2×3 inches, perfect for a single serving. Transfer the pieces to a serving platter. The best way to enjoy this bake is with crispy nori sheets! Offer a stack of nori sheets, cut into small rectangles (about 2×3 inches). Guests can then take a piece of the sushi bake, place it on a nori rectangle, and wrap it up like a mini taco. This adds a crucial crunch and authentic sushi experience that elevates the entire dish.
-
Optional Toppings at the Table:
For an even more personalized experience, you can set out additional optional toppings for your guests. Thinly sliced avocado adds a rich, creamy element that pairs wonderfully with the spicy salmon. Extra sriracha or a side of soy sauce can be offered for those who like to customize their spice level or add more umami. Fresh lime wedges can also be provided for a bright, citrusy squeeze over the top. The beauty of the Spicy Salmon Sushi Bake is its versatility and the communal joy of sharing such a delicious, comforting, yet exciting dish.
Conclusion:
So there you have it, my friends! We’ve journeyed through the simple yet utterly magnificent process of creating what I believe is one of the most exciting and satisfying dishes you can whip up in your own kitchen. This isn’t just another weeknight meal; it’s an experience, a flavor explosion that perfectly balances creamy, savory, and that incredible kick of spice we all crave. Forget the fuss of traditional sushi rolling; this recipe delivers all those beloved flavors and textures in a wonderfully accessible format. It’s the kind of dish that truly elevates a casual dinner into something special, a guaranteed crowd-pleaser that will have everyone asking for the recipe.
The magic of this particular Spicy Salmon Sushi Bake lies in its brilliant simplicity and its complex layers of taste, making it an absolute showstopper without requiring hours of effort. The flaky salmon, infused with a delightful umami marinade, baked to perfection atop a bed of perfectly seasoned rice, and crowned with that irresistible spicy mayo – it’s simply divine. I promise you, from the moment that golden-brown crust emerges from your oven, filling your home with an intoxicating aroma, you’ll understand why this dish has captured so many hearts, including mine. It’s comforting, it’s vibrant, and it offers a deeply satisfying culinary adventure right from your very own kitchen countertop.
But the fun doesn’t stop once it’s out of the oven! This versatile bake offers a plethora of ways to enjoy it, allowing you to customize each bite to your preference. My absolute favorite way to devour this culinary masterpiece is by scooping generous portions onto crisp, toasted nori sheets. The crunch of the seaweed provides a fantastic textural contrast to the soft rice and rich salmon, acting as the perfect edible wrapper. Don’t forget your classic sushi accompaniments! Thinly sliced avocado adds a creamy, cool counterpoint, while crisp cucumber juliennes bring a refreshing crunch. A sprinkle of bright green onions or a dash of sesame seeds adds both visual appeal and a gentle nutty flavor.
For those who love extra flair, consider adding a sprinkle of iridescent masago or tobiko for that signature sushi pop, or a generous shake of furikake for an extra layer of umami and texture. Thinking beyond the traditional? Try serving your sushi bake in lettuce cups for a lighter, refreshing alternative, or even as a deconstructed bowl over extra rice with your favorite toppings for a heartier meal. And feel free to get creative with variations! While salmon is king here, you could easily substitute cooked crab meat, imitation crab, or even thinly sliced seared tuna for a different protein twist. For my plant-based friends, marinated and baked firm tofu or roasted portobello mushrooms could make a delightful, equally flavorful alternative, maintaining the essence of the bake. Want to crank up the heat? Drizzle extra sriracha directly onto your portion. Prefer a touch of sweetness? A swirl of unagi (eel) sauce can beautifully complement the savory notes. The beauty is truly in your hands to make it your own signature dish.
I genuinely hope that reading through this recipe has inspired you, as much as making it inspires me every time. There’s a unique joy that comes from creating something so profoundly delicious and sharing it with loved ones, or simply savoring it yourself after a long day.
So, I implore you: clear your schedule, gather your ingredients, and set aside some time this week to bring this delightful creation to life in your own kitchen. You will be so glad you did. The reward of that first perfect bite, laden with flavor and texture, is truly unparalleled.
And once you’ve experienced the magic, I’d be absolutely thrilled to hear all about it! Did you add a secret ingredient? Did you serve it in an unexpected way? Did it become an instant family favorite, just like it did in my household? Please don’t hesitate to share your culinary adventures, your photos, your triumphs, and even your creative twists on this recipe. Your insights and experiences inspire me and our wonderful community of home cooks. Cooking should be an adventure, a source of comfort, and a means of expressing creativity, and this particular bake offers all of that and more. Embark on this delicious journey, trust your instincts, and prepare to fall head over heels for the incredible flavors you’re about to unleash. Happy cooking, everyone, and I can’t wait to see what you create!
Spicy Salmon Sushi Bake
Spicy Salmon Sushi Bake offers a delightful and accessible way to enjoy sushi flavors at home. This layered casserole transforms intricate sushi making into a simple, satisfying dish, perfect for weeknight dinners and gatherings. It features seasoned sushi rice, creamy, spicy salmon, and a rich mayo drizzle, all baked to golden perfection.
Ingredients
-
2 cups cooked sushi rice
-
1 tablespoon rice vinegar
-
½ teaspoon sugar
-
½ teaspoon salt
-
12 oz skinless salmon fillet, cooked & flaked
-
¼ cup mayonnaise
-
2 tablespoons Sriracha sauce
-
1 tablespoon soy sauce
-
1 teaspoon sesame oil
-
½ cup shredded mozzarella cheese
-
2 sheets roasted nori, cut into small squares
-
2 green onions, thinly sliced
-
1 tablespoon toasted sesame seeds
Instructions
-
Step 1
In a small bowl, combine rice vinegar, sugar, and salt; stir until dissolved. Gently fold this mixture into the cooked sushi rice. Press the seasoned rice evenly into a greased 9×13-inch baking dish to form a compact base. -
Step 2
In a mixing bowl, combine the cooked and flaked salmon, mayonnaise, Sriracha sauce, soy sauce, sesame oil, and shredded mozzarella cheese. Mix gently until all ingredients are well combined. -
Step 3
Preheat oven to 375°F (190°C). Evenly spread the prepared salmon filling over the rice base in the baking dish. Bake for 15-20 minutes, or until the top is lightly golden brown and bubbly. -
Step 4
Remove from oven and let cool for 5-10 minutes. Sprinkle with thinly sliced green onions and toasted sesame seeds. Cut into squares and serve with roasted nori sheets for wrapping.
Important Information
Nutrition Facts (Per Serving)
It is important to consider this information as approximate and not to use it as definitive health advice.
Allergy Information
Please check ingredients for potential allergens and consult a health professional if in doubt.