Coquito Tiramisu: Prepare to experience a flavor explosion that marries the best of two beloved desserts! Imagine the creamy, coconutty richness of Puerto Rican Coquito swirled into the coffee-soaked, mascarpone-layered goodness of classic Italian Tiramisu. Intrigued? I certainly was when I first conceived this delightful fusion, and let me tell you, the result is nothing short of spectacular.
Coquito, often dubbed “Puerto Rican Eggnog,” is a traditional Christmas beverage steeped in history and cultural significance. Passed down through generations, each family boasts their own secret recipe, a testament to the drink’s cherished place in Puerto Rican celebrations. Tiramisu, on the other hand, is a relatively modern Italian invention, believed to have originated in the Veneto region in the late 20th century. Its name, meaning “pick me up” or “cheer me up,” hints at its invigorating combination of coffee and cocoa.
So, why does this Coquito Tiramisu work so well? It’s all about the harmonious blend of flavors and textures. The creamy, spiced coconut milk of the Coquito infuses the ladyfingers with a unique tropical sweetness, while the mascarpone cheese provides a smooth, decadent counterpoint. The coffee element remains, offering that familiar, comforting bitterness that balances the sweetness perfectly. This dessert is not only incredibly delicious but also surprisingly easy to assemble, making it ideal for holiday gatherings, special occasions, or simply a delightful treat to brighten your day. Get ready to impress your friends and family with this unforgettable dessert!

Ingredients:
- For the Ladyfingers:
- 1 cup all-purpose flour
- 1/4 teaspoon salt
- 4 large eggs, separated
- 1/2 cup granulated sugar, divided
- 1 teaspoon vanilla extract
- Powdered sugar, for dusting
- For the Coquito Soak:
- 1 can (13.5 oz) coconut milk
- 1 can (12 oz) evaporated milk
- 1 can (14 oz) sweetened condensed milk
- 1/2 cup white rum (or more, to taste – feel free to adjust!)
- 1/4 teaspoon ground cinnamon
- 1/8 teaspoon ground nutmeg
- 1/4 teaspoon vanilla extract
- For the Mascarpone Cream:
- 16 oz mascarpone cheese, softened
- 1 1/2 cups heavy cream, cold
- 1/2 cup powdered sugar
- 1 teaspoon vanilla extract
- For Dusting:
- Ground cinnamon
- Grated nutmeg
Making the Ladyfingers:
Okay, let’s tackle those ladyfingers first. Don’t be intimidated! They’re easier than you think, and making them from scratch really elevates this Coquito Tiramisu.
- Preheat and Prep: Preheat your oven to 350°F (175°C). Line a baking sheet with parchment paper. This is crucial – the ladyfingers will stick otherwise.
- Dry Ingredients: In a medium bowl, whisk together the flour and salt. Set aside for now.
- Egg Yolks and Sugar: In a large bowl, beat the egg yolks with 1/4 cup of the granulated sugar until pale yellow and slightly thickened. This usually takes about 3-5 minutes with an electric mixer. Add the vanilla extract and mix until combined.
- Folding: Gradually add the dry ingredients to the egg yolk mixture, mixing on low speed until just combined. Be careful not to overmix! Overmixing will develop the gluten and make the ladyfingers tough.
- Egg Whites and Sugar: In a separate, clean bowl (make sure it’s grease-free!), beat the egg whites with an electric mixer until soft peaks form. Gradually add the remaining 1/4 cup of granulated sugar, beating until stiff, glossy peaks form. This is what gives the ladyfingers their airy texture.
- Combine Gently: Gently fold the egg whites into the egg yolk mixture in two additions. Be very careful not to deflate the egg whites. Use a rubber spatula and fold from the bottom up, turning the bowl as you go.
- Pipe the Ladyfingers: Transfer the batter to a piping bag fitted with a large round tip (or just cut the tip off a zip-top bag). Pipe the batter onto the prepared baking sheet into 3-4 inch long strips, leaving about an inch between each strip.
- Dust and Bake: Dust the ladyfingers generously with powdered sugar. This helps create a slightly crisp exterior. Bake for 12-15 minutes, or until lightly golden brown.
- Cool Completely: Let the ladyfingers cool completely on the baking sheet before removing them. They’ll be delicate when warm, so be patient!
Making the Coquito Soak:
This is where the magic happens! The Coquito soak is what infuses the ladyfingers with that delicious, festive flavor.
- Combine Ingredients: In a large bowl or pitcher, combine the coconut milk, evaporated milk, sweetened condensed milk, rum, cinnamon, nutmeg, and vanilla extract.
- Whisk Well: Whisk all the ingredients together until well combined.
- Taste and Adjust: Taste the Coquito soak and adjust the rum or spices to your liking. Remember, the flavor will mellow out a bit as it soaks into the ladyfingers.
- Chill: Cover the Coquito soak and refrigerate for at least 30 minutes to allow the flavors to meld. This step is optional, but chilling it helps to prevent the tiramisu from becoming too soggy.
Making the Mascarpone Cream:
The mascarpone cream is what gives this tiramisu its rich and decadent texture. Make sure your mascarpone is softened for the best results!
- Beat Mascarpone: In a large bowl, beat the softened mascarpone cheese with an electric mixer until smooth and creamy.
- Add Heavy Cream: In a separate bowl, beat the cold heavy cream with an electric mixer until soft peaks form.
- Add Powdered Sugar and Vanilla: Gradually add the powdered sugar and vanilla extract to the whipped cream, beating until stiff peaks form. Be careful not to overwhip!
- Combine Gently: Gently fold the whipped cream into the mascarpone cheese in two additions. Again, be careful not to deflate the whipped cream. Use a rubber spatula and fold from the bottom up, turning the bowl as you go.
Assembling the Coquito Tiramisu:
Now for the fun part – putting it all together! This is where your patience will pay off. Layering is key to a beautiful and delicious tiramisu.
- Prepare Your Dish: Choose a 9×13 inch baking dish or a similar-sized dish.
- Dip the Ladyfingers: Quickly dip each ladyfinger into the Coquito soak, making sure to soak both sides. Don’t soak them for too long, or they’ll become too soggy. A quick dip is all you need.
- First Layer of Ladyfingers: Arrange the soaked ladyfingers in a single layer on the bottom of the baking dish. You may need to break some of the ladyfingers to fit.
- First Layer of Mascarpone Cream: Spread half of the mascarpone cream evenly over the ladyfinger layer.
- Second Layer of Ladyfingers: Repeat the dipping process with the remaining ladyfingers and arrange them in a second layer on top of the mascarpone cream.
- Second Layer of Mascarpone Cream: Spread the remaining mascarpone cream evenly over the second layer of ladyfingers.
- Dust with Cinnamon and Nutmeg: Generously dust the top of the tiramisu with ground cinnamon and grated nutmeg. This adds a beautiful aroma and a touch of warmth.
- Chill: Cover the tiramisu with plastic wrap and refrigerate for at least 4 hours, or preferably overnight. This allows the flavors to meld and the tiramisu to set properly.
- Serve and Enjoy: Before serving, dust with a little extra cinnamon and nutmeg, if desired. Cut into squares and enjoy!
Tips for Success:
- Don’t Oversoak the Ladyfingers: Soggy ladyfingers are the enemy of a good tiramisu. A quick dip is all you need.
- Use High-Quality Mascarpone: The mascarpone cheese is the star of the cream, so use the best quality you can find.
- Chill Thoroughly: Chilling the tiramisu is essential for allowing the flavors to meld and the texture to set. Don’t skip this step!
- Adjust the Rum to Your Liking: Feel free to adjust the amount of rum in the Coquito soak to your taste. You can also use rum extract for a non-alcoholic version.
- Make Ahead: This Coquito Tiramisu is a great make-ahead dessert. It can be made up to 2 days in advance and stored in the refrigerator.
Variations:
- Coffee Version: For a more traditional tiramisu flavor, you can add a shot of espresso to the Coquito soak.
- Chocolate Version: Dust the tiramisu with cocoa powder instead of cinnamon and nutmeg. You can also add chocolate shavings for extra decadence.
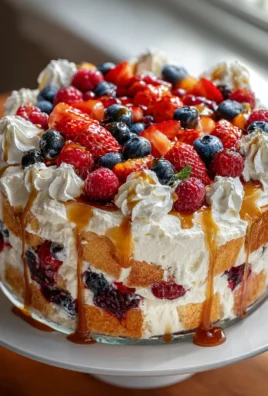
- Fruit Version: Add a layer of fresh berries between the ladyfingers and the mascarpone cream.

Conclusion:
This Coquito Tiramisu is more than just a dessert; it’s a celebration of flavors, a fusion of cultures, and a guaranteed crowd-pleaser. The creamy, coconut-infused coquito beautifully soaks the ladyfingers, creating a luscious base that perfectly complements the rich mascarpone cream and the subtle hint of coffee. It’s a symphony of textures and tastes that will leave you wanting more. Trust me, once you take that first bite, you’ll understand why I’m so excited about this recipe!
Why is this a must-try? Because it’s unexpectedly delightful! It takes the comforting familiarity of tiramisu and elevates it with the vibrant, festive flavors of coquito. It’s a unique and memorable dessert that’s perfect for any occasion, from holiday gatherings to casual weeknight treats. Plus, it’s surprisingly easy to make. While it looks impressive, the steps are straightforward, and the result is well worth the effort. You don’t need to be a professional baker to whip up this masterpiece.
Looking for serving suggestions? I love to dust the top generously with cocoa powder right before serving for a beautiful presentation and an extra layer of chocolatey goodness. You could also garnish it with toasted coconut flakes or a sprinkle of cinnamon for added flavor and visual appeal. For a truly decadent experience, serve it with a dollop of whipped cream or a scoop of vanilla ice cream.
And the variations? Oh, the possibilities are endless! If you’re not a fan of coffee, you can substitute it with chocolate milk or even a flavored liqueur like amaretto or Frangelico. For a non-alcoholic version, use a strong brewed decaf coffee or a coffee-flavored syrup. You can also experiment with different types of ladyfingers, such as chocolate or almond-flavored ones. If you’re feeling adventurous, try adding a layer of chopped nuts, such as almonds or pecans, for added crunch. Another fun variation is to incorporate some fresh berries, like raspberries or strawberries, for a burst of fruity flavor. Consider adding a thin layer of dulce de leche for an extra layer of caramel sweetness.
I’ve poured my heart into perfecting this Coquito Tiramisu recipe, and I’m confident that you’ll love it as much as I do. It’s a dessert that’s sure to impress your friends and family, and it’s a wonderful way to add a touch of festive flair to any occasion.
So, what are you waiting for? Gather your ingredients, put on your apron, and get ready to create a truly unforgettable dessert. I can’t wait to hear about your experience! Please, try this recipe and share your creations with me! Let me know what you think in the comments below. Did you make any variations? What did your friends and family think? I’m eager to see your photos and hear your stories. Happy baking! And remember, the most important ingredient is love! Enjoy!
Coquito Tiramisu: A Festive Twist on a Classic Dessert
Coquito Tiramisu: Homemade ladyfingers soaked in creamy Coquito, layered with mascarpone cream, and dusted with cinnamon and nutmeg. A festive twist on a classic!
Ingredients
- 1 cup all-purpose flour
- 1/4 teaspoon salt
- 4 large eggs, separated
- 1/2 cup granulated sugar, divided
- 1 teaspoon vanilla extract
- Powdered sugar, for dusting
- 1 can (13.5 oz) coconut milk
- 1 can (12 oz) evaporated milk
- 1 can (14 oz) sweetened condensed milk
- 1/2 cup white rum (or more, to taste – feel free to adjust!)
- 1/4 teaspoon ground cinnamon
- 1/8 teaspoon ground nutmeg
- 1/4 teaspoon vanilla extract
- 16 oz mascarpone cheese, softened
- 1 1/2 cups heavy cream, cold
- 1/2 cup powdered sugar
- 1 teaspoon vanilla extract
- Ground cinnamon
- Grated nutmeg
Instructions
- Preheat your oven to 350°F (175°C). Line a baking sheet with parchment paper.
- In a medium bowl, whisk together the flour and salt. Set aside.
- In a large bowl, beat the egg yolks with 1/4 cup of the granulated sugar until pale yellow and slightly thickened (3-5 minutes). Add the vanilla extract and mix until combined.
- Gradually add the dry ingredients to the egg yolk mixture, mixing on low speed until just combined. Be careful not to overmix.
- In a separate, clean bowl, beat the egg whites with an electric mixer until soft peaks form. Gradually add the remaining 1/4 cup of granulated sugar, beating until stiff, glossy peaks form.
- Gently fold the egg whites into the egg yolk mixture in two additions. Be very careful not to deflate the egg whites.
- Transfer the batter to a piping bag fitted with a large round tip (or just cut the tip off a zip-top bag). Pipe the batter onto the prepared baking sheet into 3-4 inch long strips, leaving about an inch between each strip.
- Dust the ladyfingers generously with powdered sugar. Bake for 12-15 minutes, or until lightly golden brown.
- Let the ladyfingers cool completely on the baking sheet before removing them.
- In a large bowl or pitcher, combine the coconut milk, evaporated milk, sweetened condensed milk, rum, cinnamon, nutmeg, and vanilla extract.
- Whisk all the ingredients together until well combined.
- Taste the Coquito soak and adjust the rum or spices to your liking.
- Cover the Coquito soak and refrigerate for at least 30 minutes to allow the flavors to meld.
- In a large bowl, beat the softened mascarpone cheese with an electric mixer until smooth and creamy.
- In a separate bowl, beat the cold heavy cream with an electric mixer until soft peaks form.
- Gradually add the powdered sugar and vanilla extract to the whipped cream, beating until stiff peaks form. Be careful not to overwhip!
- Gently fold the whipped cream into the mascarpone cheese in two additions. Again, be careful not to deflate the whipped cream.
- Choose a 9×13 inch baking dish or a similar-sized dish.
- Quickly dip each ladyfinger into the Coquito soak, making sure to soak both sides. Don’t soak them for too long, or they’ll become too soggy. A quick dip is all you need.
- Arrange the soaked ladyfingers in a single layer on the bottom of the baking dish. You may need to break some of the ladyfingers to fit.
- Spread half of the mascarpone cream evenly over the ladyfinger layer.
- Repeat the dipping process with the remaining ladyfingers and arrange them in a second layer on top of the mascarpone cream.
- Spread the remaining mascarpone cream evenly over the second layer of ladyfingers.
- Generously dust the top of the tiramisu with ground cinnamon and grated nutmeg. This adds a beautiful aroma and a touch of warmth.
- Cover the tiramisu with plastic wrap and refrigerate for at least 4 hours, or preferably overnight. This allows the flavors to meld and the tiramisu to set properly.
- Before serving, dust with a little extra cinnamon and nutmeg, if desired. Cut into squares and enjoy!
Notes
- Don’t Oversoak the Ladyfingers: Soggy ladyfingers are the enemy of a good tiramisu. A quick dip is all you need.
- Use High-Quality Mascarpone: The mascarpone cheese is the star of the cream, so use the best quality you can find.
- Chill Thoroughly: Chilling the tiramisu is essential for allowing the flavors to meld and the texture to set. Don’t skip this step!
- Adjust the Rum to Your Liking: Feel free to adjust the amount of rum in the Coquito soak to your taste. You can also use rum extract for a non-alcoholic version.
- Make Ahead: This Coquito Tiramisu is a great make-ahead dessert. It can be made up to 2 days in advance and stored in the refrigerator.