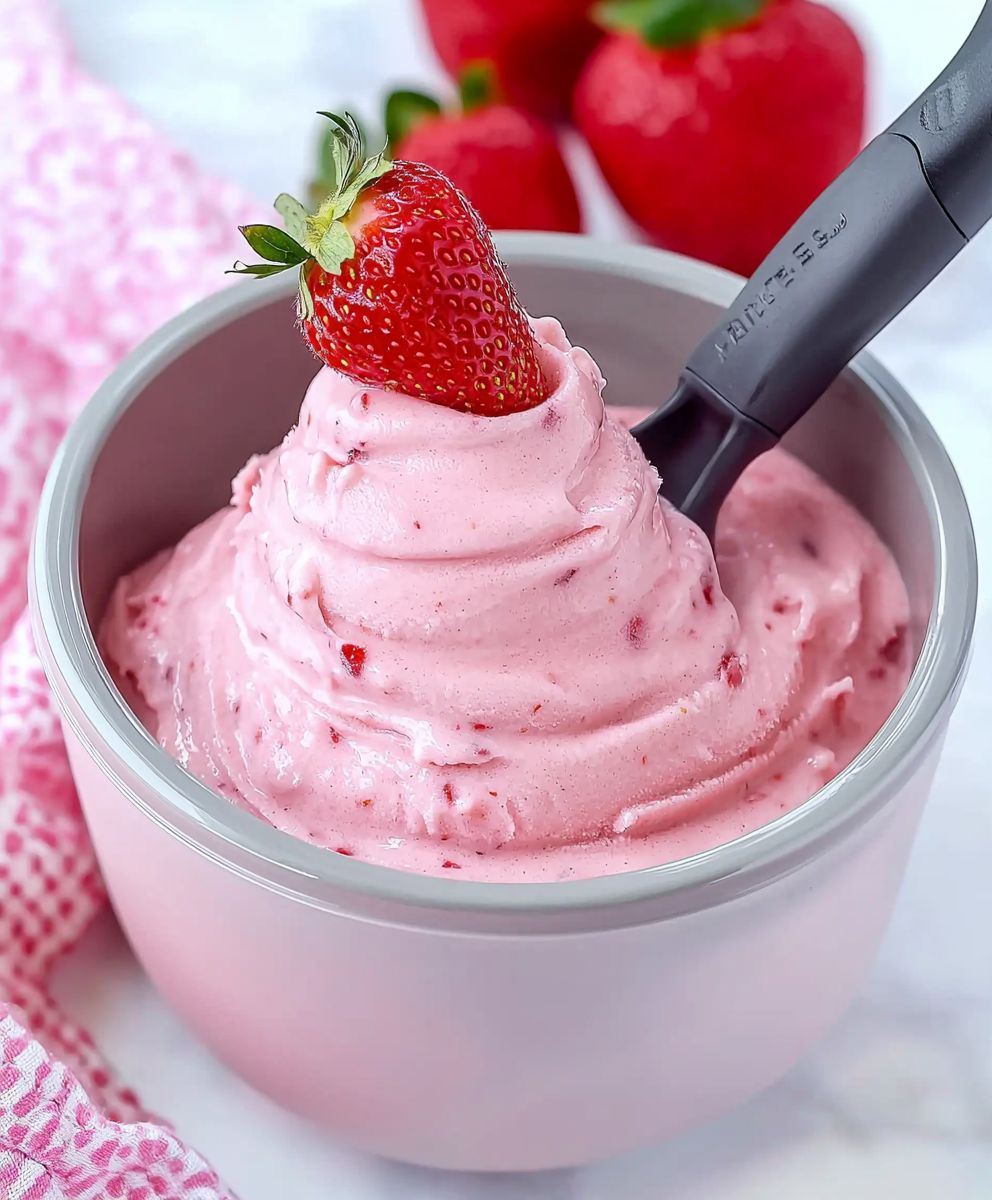
Ninja Creami Strawberry Frozen Yogurt: Get ready to experience the creamiest, dreamiest, and most delightful frozen treat you’ve ever made at home! Forget store-bought pints packed with artificial ingredients and sky-high prices. I’m about to show you how to whip up a batch of luscious strawberry frozen yogurt in your Ninja Creami that’s so good, you’ll swear it came from a gourmet ice cream shop.
Frozen yogurt, or “froyo” as it’s affectionately known, has a surprisingly interesting history. While its popularity exploded in the 1970s and 80s as a healthier alternative to ice cream, the concept of frozen dairy desserts dates back centuries. Cultures around the world have long enjoyed variations of chilled and sweetened milk or yogurt. Today, froyo holds a special place in our hearts (and freezers!) because it offers a lighter, tangier, and often more customizable dessert option.
What makes Ninja Creami Strawberry Frozen Yogurt so irresistible? It’s the perfect balance of sweet and tart, the incredibly smooth texture achieved by the Ninja Creami, and the sheer convenience of making it yourself. You control the ingredients, ensuring a healthier and more flavorful treat. Plus, who can resist the vibrant pink hue and refreshing taste of strawberries? Whether you’re looking for a guilt-free dessert, a post-workout snack, or simply a delicious way to cool down on a hot day, this recipe is guaranteed to become a new favorite. So, grab your Ninja Creami and let’s get churning!

Ingredients:
- 1 (16 ounce) bag frozen strawberries, unsweetened
- 1 cup nonfat plain Greek yogurt
- 1/4 cup milk (dairy or non-dairy, I prefer almond milk)
- 2 tablespoons honey (or maple syrup, agave, or your favorite sweetener to taste)
- 1 teaspoon vanilla extract
- 1/4 teaspoon lemon juice (optional, but enhances the strawberry flavor)
Preparing the Strawberry Base:
Okay, let’s get started! This recipe is super simple, and the Ninja Creami makes it incredibly easy to whip up a delicious and healthy frozen yogurt. The key to a smooth and creamy texture is to make sure your ingredients are properly prepared before freezing.
- Combine the Ingredients: In a blender or food processor, combine the frozen strawberries, Greek yogurt, milk, honey (or your chosen sweetener), vanilla extract, and lemon juice (if using).
- Blend Until Smooth: Blend the mixture until it’s completely smooth. You might need to stop the blender a few times to scrape down the sides to ensure everything is incorporated. The consistency should be thick but pourable. If it’s too thick, add a tablespoon of milk at a time until you reach the desired consistency.
- Taste and Adjust: Give the mixture a taste and adjust the sweetness as needed. Remember that freezing can slightly dull the sweetness, so you might want to make it a little sweeter than you think.
- Pour into Creami Pint: Pour the blended mixture into your Ninja Creami pint container. Make sure to leave about an inch of space at the top, as the mixture will expand slightly when frozen.
- Freeze for at Least 24 Hours: Place the pint in the freezer and freeze for at least 24 hours. This is crucial for achieving the right texture. The mixture needs to be completely frozen solid. I usually freeze mine overnight and then some, just to be sure.
Creami Processing:
Now for the fun part! This is where the Ninja Creami magic happens. Make sure your pint is frozen solid before proceeding. If it’s not completely frozen, the Creami won’t be able to process it properly.
- Prepare the Creami: Remove the frozen pint from the freezer. Let it sit on the counter for about 5-10 minutes to soften slightly. This will make it easier for the Creami to process. Don’t let it sit out for too long, though, or it will become too soft.
- Install the Pint: Place the frozen pint into the outer bowl of the Ninja Creami. Make sure it’s securely locked in place.
- Attach the Blade: Attach the Creami blade to the outer bowl lid. Make sure it’s properly aligned and locked in place.
- Lock the Lid: Place the lid onto the outer bowl and lock it into the Ninja Creami machine.
- Process on “Lite Ice Cream” Setting: Select the “Lite Ice Cream” setting on your Ninja Creami and press start. The machine will process the frozen mixture for a few minutes.
- Inspect the Texture: After the first processing cycle, remove the outer bowl from the machine. Take a look at the texture of the frozen yogurt. It will likely be crumbly or powdery. This is normal!
- Re-Spin (if needed): If the frozen yogurt is crumbly, use a spoon or fork to smooth out the top surface. Then, place the outer bowl back into the machine, lock the lid, and press the “Re-Spin” button. This will further process the mixture and create a smoother, creamier texture. You might need to Re-Spin it 1-3 times, depending on your freezer and the initial texture.
- Add Mix-Ins (Optional): If you want to add any mix-ins, such as chopped strawberries, chocolate chips, or granola, now is the time! Create a well in the center of the frozen yogurt, add your mix-ins, and then use the “Mix-In” button on the Ninja Creami to incorporate them.
Serving and Storage:
Your Ninja Creami Strawberry Frozen Yogurt is now ready to be enjoyed! It’s best served immediately for the creamiest texture. However, you can also store it in the freezer for later.
- Serve Immediately: Scoop the frozen yogurt into bowls or cones and enjoy! Garnish with fresh strawberries, whipped cream, or any other toppings you like.
- Store Leftovers: If you have any leftovers, transfer them to an airtight container and store them in the freezer. Keep in mind that the texture may change slightly after being refrozen. It might become a bit harder.
- Re-Spin After Freezing (if needed): If the frozen yogurt becomes too hard after being refrozen, you can re-spin it in the Ninja Creami to restore its creamy texture. Just let it thaw slightly for a few minutes before processing.
Tips and Tricks for Perfect Frozen Yogurt:
- Use High-Quality Ingredients: The better the quality of your ingredients, the better the final product will be. I recommend using fresh, ripe strawberries for the best flavor.
- Adjust Sweetness to Your Liking: Don’t be afraid to experiment with different sweeteners and adjust the amount to your taste. You can use honey, maple syrup, agave, or even sugar substitutes.
- Don’t Overfill the Pint: Make sure to leave enough space at the top of the pint container to allow for expansion during freezing. Overfilling can cause the mixture to overflow.
- Freeze for the Right Amount of Time: Freezing for at least 24 hours is essential for achieving the right texture. If the mixture is not completely frozen, the Creami won’t be able to process it properly.
- Let it Soften Slightly Before Processing: Letting the frozen pint sit on the counter for a few minutes before processing will make it easier for the Creami to work its magic.
- Re-Spin as Needed: Don’t be afraid to re-spin the frozen yogurt multiple times to achieve the desired texture.
- Experiment with Mix-Ins: Get creative with your mix-ins! Try adding different fruits, nuts, chocolate chips, or even cookies.
- Clean Your Creami Properly: Always clean your Ninja Creami after each use to prevent buildup and ensure optimal performance.
Variations:
This recipe is a great base for experimenting with different flavors and ingredients. Here are a few ideas to get you started:
- Chocolate Strawberry: Add 2 tablespoons of cocoa powder to the mixture before blending.
- Strawberry Cheesecake: Add 2 ounces of softened cream cheese to the mixture before blending.
- Strawberry Banana: Add 1/2 of a frozen banana to the mixture before blending.
- Vegan Strawberry Frozen Yogurt: Use non-dairy yogurt and milk.
Enjoy your homemade Ninja Creami Strawberry Frozen Yogurt! I hope you love it as much as I do. It’s a healthy and delicious treat that’s perfect for any occasion.
Conclusion:
This Ninja Creami Strawberry Frozen Yogurt recipe is truly a game-changer, and I wholeheartedly believe it deserves a spot in your regular dessert rotation. Why? Because it delivers that creamy, dreamy frozen yogurt texture we all crave, but with the added bonus of being incredibly easy to make and customizable to your heart’s content. Forget store-bought options loaded with artificial ingredients and excessive sugar; this homemade version allows you to control exactly what goes into your treat, making it a healthier and more satisfying choice.
Think about it: fresh, vibrant strawberry flavor bursting in every spoonful, a smooth, melt-in-your-mouth consistency, and the satisfaction of knowing you created something delicious from scratch. It’s the perfect antidote to a hot summer day, a delightful after-dinner treat, or even a guilt-free snack any time you need a little pick-me-up. The simplicity of the recipe also makes it incredibly appealing. With just a handful of ingredients and the magic of the Ninja Creami, you can whip up a batch of this frozen yogurt in no time.
But the best part? The possibilities are endless! While I’ve shared my go-to strawberry version, feel free to experiment with other fruits. Imagine a blueberry frozen yogurt, a raspberry swirl, or even a tropical mango creation. You could also add mix-ins like chocolate chips, chopped nuts, granola, or even a drizzle of honey for extra sweetness. For a richer flavor, try using Greek yogurt instead of regular yogurt. And if you’re feeling adventurous, consider adding a splash of vanilla extract or a pinch of cinnamon to enhance the overall taste.
Serving suggestions are just as versatile. Enjoy it straight from the pint for a classic frozen yogurt experience. Or, get creative and use it as a topping for waffles, pancakes, or even a warm brownie. It’s also fantastic blended into a smoothie for a refreshing and healthy breakfast or snack. For a more elegant presentation, try scooping it into a fancy glass and garnishing with fresh strawberries and a sprig of mint. You could even create a frozen yogurt parfait with layers of granola, fruit, and a drizzle of your favorite sauce.
I’m so excited for you to try this recipe and experience the joy of homemade Ninja Creami Strawberry Frozen Yogurt for yourself. It’s a guaranteed crowd-pleaser, and I have no doubt that it will become a family favorite.
So, what are you waiting for? Gather your ingredients, dust off your Ninja Creami, and get ready to create some frozen yogurt magic! And most importantly, don’t forget to share your creations with me! I’d love to see your variations, hear your feedback, and learn about your experiences. Tag me in your photos on social media, leave a comment below, or send me an email – I can’t wait to hear from you! Happy churning! Let me know what other flavors you come up with! I am always looking for new ideas.
Ninja Creami Strawberry Frozen Yogurt: The Ultimate Guide & Recipe
Easy, healthy Strawberry Frozen Yogurt made in your Ninja Creami with frozen strawberries, Greek yogurt, and honey for a guilt-free treat.
Ingredients
- 1 (16 ounce) bag frozen strawberries, unsweetened
- 1 cup nonfat plain Greek yogurt
- 1/4 cup milk (dairy or non-dairy, almond milk preferred)
- 2 tablespoons honey (or maple syrup, agave, or your favorite sweetener to taste)
- 1 teaspoon vanilla extract
- 1/4 teaspoon lemon juice (optional, but enhances the strawberry flavor)
Instructions
- Combine Ingredients: In a blender or food processor, combine the frozen strawberries, Greek yogurt, milk, honey (or chosen sweetener), vanilla extract, and lemon juice (if using).
- Blend Until Smooth: Blend until completely smooth, scraping down the sides as needed. Add milk (1 tablespoon at a time) if too thick.
- Taste and Adjust: Taste and adjust sweetness as needed. Remember freezing can dull the sweetness.
- Pour into Creami Pint: Pour the mixture into your Ninja Creami pint container, leaving about an inch of space at the top.
- Freeze: Freeze for at least 24 hours, until completely solid.
- Soften Slightly: Remove the frozen pint from the freezer and let it sit on the counter for 5-10 minutes to soften slightly.
- Install Pint and Blade: Place the frozen pint into the outer bowl of the Ninja Creami and lock it in place. Attach the Creami blade to the outer bowl lid and lock it in place.
- Lock the Lid: Place the lid onto the outer bowl and lock it into the Ninja Creami machine.
- Process: Select the “Lite Ice Cream” setting and press start.
- Inspect and Re-Spin: After the first cycle, check the texture. If crumbly, smooth the top and re-spin using the “Re-Spin” button. Repeat 1-3 times until creamy.
- Add Mix-Ins (Optional): Create a well, add mix-ins, and use the “Mix-In” button to incorporate.
- Serve: Scoop and enjoy immediately.
- Store Leftovers: Transfer leftovers to an airtight container and store in the freezer. Re-spin if needed after refreezing.
Notes
- Use high-quality ingredients for the best flavor.
- Adjust sweetness to your liking.
- Don’t overfill the pint container.
- Freeze for at least 24 hours.
- Let it soften slightly before processing.
- Re-spin as needed to achieve the desired texture.
- Experiment with mix-ins.
- Clean your Creami properly after each use.